Introduction
In this guide, we will explore how to use managed identities to connect to Azure SQL Database. We will also look at how to automate the process of creating a new Azure SQL Database and setting up the necessary permissions for the managed identity.
Azure SQL Database

Azure SQL Database is a fully managed relational database as a service offering provided by Microsoft. It is built on top of the venerable SQL Server engine. It is a cloud-based service that is highly available, scalable, and secure. Azure SQL is a great choice for building modern applications that require a relational database.
Managed identities

Managed identities are a feature of Microsoft Entra that allows you to securely authenticate your applications and services without needing to manage credentials. Managed identities are a great way to secure your applications and services by eliminating the need to store credentials in your code or configuration files.
Why use Managed Identities?
What this means in practice is that you can do away with storing connection strings, passwords, and other sensitive information in your code or configuration files. Instead, you can use managed identities to authenticate your applications and services to Azure resources.
Create an Azure SQL Database using Bicep
We need to create a new Azure SQL Database to experiment with managed identities. We can use Bicep to define the infrastructure as code. We will be creating a database that makes strict use of Entra for authentication. The template will assign your user account as the database administrator.
Entra was formerly known as Azure Active Directory which is why you will see references to AzureAD / AAD in the code.
Here is an example Bicep file that creates an Azure SQL Database:
param location string = resourceGroup().location

@description('SQL Server administrator user display name.')
param adminName string

@description('SQL Server administrator user object ID.')
param adminObjectId string

var resourcePrefix = uniqueString(resourceGroup().id)

// azure sql server
resource sqlServer 'Microsoft.Sql/servers@2024-05-01-preview' = {
  name: '${resourcePrefix}-sql'
  location: location
  properties: {
    minimalTlsVersion: '1.2'
    publicNetworkAccess: 'Enabled'
    version: '12.0'
    administrators: {
      administratorType: 'ActiveDirectory'
      azureADOnlyAuthentication: true // enforce use of managed identities
      principalType: 'User'
      login: adminName
      sid: adminObjectId
      tenantId: subscription().tenantId
    }
  }

  // azure sql database
  resource database 'databases' = {
    name: '${resourcePrefix}-sqldb'
    location: location
    sku: {
      name: 'Basic'
      tier: 'Basic'
      capacity: 5
    }
    properties: {
      collation: 'SQL_Latin1_General_CP1_CI_AS'
    }
  }

  // allow azure services to access the database
  resource allowAzureRule 'firewallRules' = {
    name: 'allow-azure-rule'
    properties: {
      startIpAddress: '0.0.0.0'
      endIpAddress: '0.0.0.0'
    }
  }
}
You can download the above Bicep file from here.
Deploying the Bicep template
First, we need to ensure we are logged in to Azure using the Azure CLI.
az login
We will need a resource group to deploy the Azure SQL Database to. If you don’t have a resource group, you can create one using the following command:
$rgName = az group create `
  --name azsql-test-rg `
  --location australiaeast `
  --query name `
  --output tsv
This command make use of multiline strings with backticks (`). This is a feature of PowerShell that allows you to write multiline strings without needing to escape newlines. You may need to adjust the command if you are using a different shell.
The Bicep template has a couple of mandatory parameters that need to be provided when deploying the template. These are the adminName and adminObjectId parameters. We will assign these to variables for ease of use.
$adminName = az ad signed-in-user show --query displayName --output tsv
$adminObjectId = az ad signed-in-user show --query id --output tsv
Now we can finally deploy the Bicep template using the following command.
az deployment group create `
  --resource-group $rgName `
  --template-file database.bicep `
  --parameters adminName=$adminName adminObjectId=$adminObjectId
Allow your IP address to connect to the Azure SQL Database
Azure SQL Database has a firewall that restricts access to the database. By default, the firewall blocks all access to the database. To allow your IP address to connect to the database, you need to add a firewall rule to the database. The simplest way to do this is to use the Azure Portal.
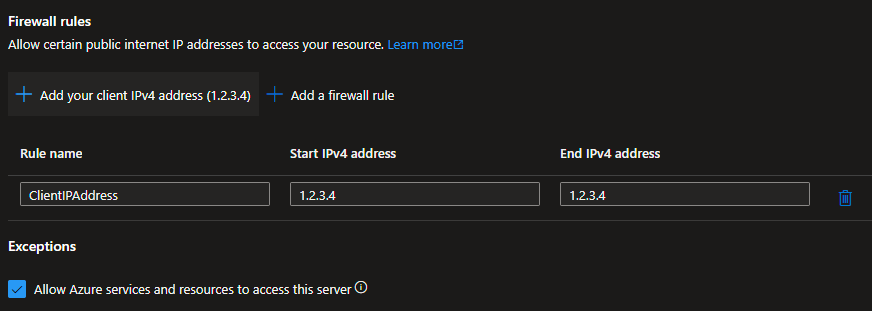
Another way of adding the firewall rule is to attempt to connect to the database using Azure Data Studio. When you try to connect to the database, you will be prompted to add a firewall rule.
SQL Script to assign database permissions
After creating the Azure SQL Database, we need to run a SQL script to set up the necessary permissions for the managed identity. Here is an example SQL script that grants the necessary permissions to the managed identity:
-- Change the name of the managed identity as needed
:setvar APP_PRINCIPAL_NAME "jobs-01-func"

-- Ensure the user doesn't already exist (idempotent)
IF NOT EXISTS (
  SELECT [name]
  FROM sys.database_principals
  WHERE [name] = '$(APP_PRINCIPAL_NAME)'
)
BEGIN
  CREATE USER [$(APP_PRINCIPAL_NAME)] FROM EXTERNAL PROVIDER;
  ALTER ROLE db_datareader ADD MEMBER [$(APP_PRINCIPAL_NAME)];
  ALTER ROLE db_datawriter ADD MEMBER [$(APP_PRINCIPAL_NAME)];
  ALTER ROLE db_ddladmin ADD MEMBER [$(APP_PRINCIPAL_NAME)];
END
Application principal name (user name)
In this script, we are creating a new user in the database for the managed identity and granting it the necessary permissions to read, write, and execute DDL statements on the database.
The script assumes there is already a Azure application with a system assigned identity with the name jobs-01-func. This name can and should be changed to match the name of the managed identity you are using.
The script makes use of sqlcmd variables to parameterize the name of the managed identity: APP_PRINCIPAL_NAME. This allows us to reuse the script for different identities.
It’s important to note that we are using the name of the managed identity as the name of the user in the database. In other Azure RBAC assignments, we would use the object ID of the managed identity. However, in the case of Azure SQL Database, we use the name of the managed identity as the user name in the database.
The variable APP_PRINCIPAL_NAME can be set using a few methods:
- It can be set using the
:setvarcommand insqlcmdmode. This is the method used in the script above. - It can be set using the
-vcommand-line option when runningsqlcmd. - It can be set from an environment variable. This is useful when running the script in an automated environment like GitHub Actions.
Executing the SQL script
I would suggest running the script under Azure Data Studio with SQLCMD mode enabled. This will allow you to set the APP_PRINCIPAL_NAME variable and execute the script. If all goes well, you should see output similar to the following:
Started executing query at Line 2
Commands completed successfully.
Total execution time: 00:00:00.365
With the script executed, the managed identity now has the necessary permissions to read and write to the database. 😎
Bonus: Automating the process with GitHub Actions
As part of a CI/CD pipeline, you can automate the process of deploying your Azure infrasructure and setting up the necessary database permissions for the managed identity. You can use GitHub Actions to achieve this and I have created a sample workflow that demonstrates how to do this.
name: Deploy infrastructure

on:
  workflow_dispatch:
    inputs:
      environment:
        type: environment
        description: Environment to deploy to
        required: true

jobs:
  deploy:
    name: Deploy infrastructure
    runs-on: ubuntu-latest
    environment: ${{ inputs.environment }}
    permissions:
      id-token: write
    steps:
      # Checkout the repository
      - name: Checkout repository
        uses: actions/checkout@v4

      # Login to Azure
      - name: Login to Azure
        uses: azure/login@v2
        with:
          tenant-id: ${{ secrets.AZURE_TENANT_ID }}
          client-id: ${{ secrets.AZURE_CLIENT_ID }}
          subscription-id: ${{ secrets.AZURE_SUBSCRIPTION_ID }}

      # Deploy database
      - name: Deploy database
        uses: azure/arm-deploy@v2
        id: deploy_database
        with:
          scope: resourcegroup
          resourceGroupName: azsql-test-rg
          template: ${{ github.workspace }}/database.bicep
          parameters: >-
            adminName=${{ secrets.ADMIN_NAME }}
            adminObjectId=${{ secrets.ADMIN_OBJECT_ID }}

      # Grant app database access
      - name: Grant API app database access
        uses: azure/[email protected]
        with:
          path: ${{ github.workspace }}/grant-access.sql
          connection-string: ${{ secrets.DB_CONNECTION_STRING }}
        env:
          APP_PRINCIPAL_NAME: ${{ secrets.APP_PRINCIPAL_NAME }}
This workflow will deploy the Azure SQL Database using the Bicep template and then run the SQL script to grant the necessary permissions to the managed identity. The workflow uses secrets to store sensitive information like the Azure AD object ID of the user and the connection string to the database.
Conclusion
In this guide, we explored how to use managed identities to connect to Azure SQL Database. We also looked at how to automate the process of creating a new Azure SQL Database and setting up the necessary permissions for the managed identity. Managed identities are a great way to secure your applications and services by eliminating the need to store credentials in your code or configuration files.
I hope you found this guide helpful and that you can use it to secure your applications and services in Azure! 🚀